I am sorry if this is a little off topic. I made a few over the weekend. I reckon you can't get smaller than this for a USB Flash drive. If you guys would like one, drop me a message. The best thing is that, it is Vista ReadyBoost compatible!
The LEGO USB Drive featured is almost completed. I have not mounted a small ring that would allow the LEGO USB Drive to be mounted either on a Keychain or a Lanyard (perfect for showing off!)
I would like to apologise for my sub-standard photos. Photos would be re-taken with better lighting condition and using a tripod to ensure that the photos are sharp as it can be!
You can check out more details here.
Thursday, 18 December 2008
Wednesday, 17 December 2008
Simple Skid-Steer 4WD with Power Functions
Over the weekend i just wanted to build something out of the new power functions elements from the 8275 Bulldozer - hence i came up with this simple remote-controlled model with no programming but pure fun.
Each side of the wheels is controlled by 1 XL motor and steering is accomplished by turning both motors in opposite directions, just like the way you drive a tank...
This is a simple skid-steer 4WD using power functions elements including 2 XL motors, 1 battery box, 1 receiver and it can be built in under 5 minutes.
The car tends to jerk a lot while turning due to the nature of skid-steer architecture but i had a lot of fun with it, especially with the reaction i get from my sister's dog when i drive this thing around right in front of her ^_^
Wednesday, 5 November 2008
NXC Tutorial by Danny Benedettelli
If you have downloaded the NXT Tutorial by, please download it here.
Don't worry about the NXC guide. You'll only need the Guide if you are doing more advance programmes. Until then, just use the NXT Tutorial and follow it step by step.
I have gone through the tutorial and find it pretty complete. It goes through most of the basic features that are available in the NXT-G language.
I will start to write some more advance program and post them back here.
I will assume that you have already complete the NXC Tutorial and fully understand the basic NXC features as well as the C programming language.
Alternative Software for your NXT Mindstorms - NBC/NXC
Today I will be writting a short article on how to install and use alternative software. The first one I will be looking at is the NBC/NQC/NXC. You can read more about these 3 alternative software here.
The beauty about this about the language is that, you could use the standard firmware, without upgrading your NXT Firmware. Why it is great is that you could use the more advance, while having the option to use back the NXT-G software, if you wish to do a quick test or demo without flashing your firmware back to the original one.
NBC (Nxt Byte Code) is actually a very low level coding. It is about an equivalent to assembly language. Basically you can't get lower than this!
NXC is (Not eXactly C) is a high-level C language. It is written above the NBC language.
I used NBC when it was first released and upgraded to NXC when it was introduced.
You'll need to download 2 software to get this running.
Start by installing the Bricxcc (Bricx Command Centre) GUI interface. It is pretty straight forward.
Next please extract the NBC Compiler. Please remember the directory where the files have been extracted to.
You'll need to attach the NBC compiler so that you can access it from within the Bricxcc.Under the Edit menu, please seleect the Preference option.
Then select the little box with the "..." and include the path where you had extracted your NXC file.
Once you have done it, please compile the file "struct.nxc" which was included in the NBC compiler.
If you have done everything as I have explained, you should be able to compile the programme and run it.
Download the NXC Guide or NXC tutorial from this link.
I will have some tutorial on how to programme in NXC in my future post.
Wednesday, 22 October 2008
Poor Man's Key Hanger
Leaving a bunch of keys all scattered around the table bothers me and I just decided to look for some key hangers to put the poor fellas where they belong. The problem was i always forget to buy them until i got fed up so I just put together a few pieces of LEGO Technic plus some good quality double-sided tape to create my own version of key hanger, and Viola !
Another advantage for using LEGO to make key hangers was saving money on buying new ones :P
Can you think of something else to do with your LEGO ? ( preferably something useful of course. )
Wednesday, 1 October 2008
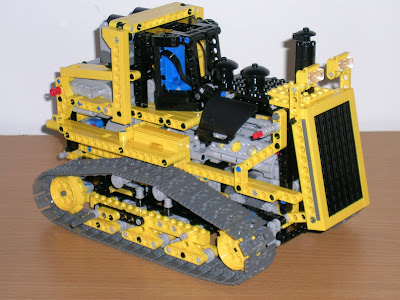
8275 Bulldozer
I got this Bulldozer for a very reasonable price from ebay about two weeks ago and this monster took me around 10 hours in total to put together :S But it was definitely worth the effort as i enjoyed every minute of it :)
The first thing you will notice when you open up the box is the huge number of bags !! ( not to mention the 3 instruction booklets )
One of the main attraction of this model is the amount of Power Functions elements in the set. This set alone gives you :
- 1 remote control
- 1 battery box
- 2 receivers
- 2 XL motors
- 2 M motors
It took me about 4 hours to finish the first book and this is how it looks like,
The design and construction technique used in this model is very efficient, compact, and solid. The first book is all about building the chassis and the mechanism for the treads.
The second book completes the rest of the functional mechanisms with all the electronics installed and it gives the bulldozer its exterior,
The final book adds the front blade and the ripper on the back to make the bulldozer complete.
In the pictures it may not look very big and let me assure this baby is HUGE ! Just to give you an idea of how big it is, i've put the bulldozer on top of my Mindstorms NXT box and took a picture.
The length of the bulldozer even exceeds the size of the box !
Overall, i was very satisfied and impressed with the bulldozer and i've already started thinking of using its treads for my next Mindstorms project....hehehe...
Monday, 22 September 2008
Kean's First Post
Hi guys, my name is Kean and im new to this blog, thanks to Eric's invitation :)
I created this back in March. Inspired by Laurens Valk's 'Support Gunner' and other nxt guns, i decided to build a variation of my own. I wanted to build a gun which looks and feels like a real gun and hence - NXT Bolter.
My background is in mechatronics engineering and currently working as a education trainer.
Since this is my first post i thought i'd post something interesting, something you wouldn't normally do with your NXT set in school. Allow me to present to you ( drums beating in the background.................) :
The NXT Bolter (Submachine gun)
I created this back in March. Inspired by Laurens Valk's 'Support Gunner' and other nxt guns, i decided to build a variation of my own. I wanted to build a gun which looks and feels like a real gun and hence - NXT Bolter.
It looks like a smg with an inverted magazine.I used 1 motor for loading the 'bullet' into the chamber, and another 2 motors for firing the 'bullet'. The firing is controlled by a touch sensor when the gunner pulls the trigger.
There are 2 modes to this gun: semi-auto and full-auto and the gunner selects the mode through the left and right button.The magazine can hold a maximum of 16 1x3 beams and the gun can be reloaded from the top of the magazine.
Wednesday, 16 July 2008
Friday, 4 July 2008
And the Winner is .... NRC 2008 Results
Congratulations to Victoria Institute for winning 1st and 2nd place...
But the real winner is the boys from SMK Taman Connaught, who came in third with 233 points. There were a dispute with the Head Judge as instructions given to them was mixed from 2 different judges.
Anyway, we all know that they are the TRUE winners, easily obtaining 265 points if there wasn't any issues with the judges.
Their team consist of
There would more photograph and stories as well as LDD file for their winning robot.
We'll be going out for dinner to celebrate their win. Yes, these are the kids that I was teaching for the past 2 months.
Once again, Congratulation to Daniel, John and Calvin for their great job done!
You can read more about his robot as well as LDD and pictures here.
His strategy for the day was also explained here in the 2nd post.
But the real winner is the boys from SMK Taman Connaught, who came in third with 233 points. There were a dispute with the Head Judge as instructions given to them was mixed from 2 different judges.
Anyway, we all know that they are the TRUE winners, easily obtaining 265 points if there wasn't any issues with the judges.
Their team consist of
- Daniel Boey
- Jonathan Lee
- Calvin Boey
There would more photograph and stories as well as LDD file for their winning robot.
We'll be going out for dinner to celebrate their win. Yes, these are the kids that I was teaching for the past 2 months.
Once again, Congratulation to Daniel, John and Calvin for their great job done!
You can read more about his robot as well as LDD and pictures here.
His strategy for the day was also explained here in the 2nd post.
Wednesday, 4 June 2008
NXTintro Workshop with Nicholas and Victor
It was another successful day for me. Two students attended my NXTintro Workshop on the 3 June 2008. Two brothers in fact. Their age was about 12 and 15 years old with zero experience with Lego or NXT mindstorms.
The day started with introduction to Lego Mindstorms. At first, they didn't know what to expect of our workshop. So I took out a previous Bot that I had built, and with my Bluetooth phone, I controlled it. Moved it around the table. They were like... WOW.... OOO....
After that demo, the kids seems more excited than me, and couldn't wait to get started with the Workshop.
We went through some basics before I allowed them to build a Robot each. Since it was their first day, instructions were given to them. Buidling with intructions is nothing difficult to do. Within 45 mins, their basic robot for the day was built. Next came the harder part of the Workshop. The NXT-G programming portion. With little or no experience in programming, teaching them would not be a simple task.
I gave them some very simple program to do. Mostly 2-3 blocks of programming. This is to get them used to the programming environment. After a few simple task, I gave them more complicated task to complete.
Before you know it, these kids were familiar and knew what they were doing. We continued the day by adding more components to the basic Bot as well as learn more advance programming methods.
Before the end of the day, I allowed both the brothers to have a little "competition". I gave them a task and allowed them ample to time to modify their bots as well as program it.
Overall, the class was a success with both the kids learning the about Robotics as well as Programming. The younger brother even requested that his Dad buy him a NXT set for his coming Birthday :p
Saturday, 5 April 2008
Light Sensor Module for NRC 2008
I have decided to build a 3 Light Sensor module to be used in my attempt to conquer the Lower and Upper Secondary category.
Why 3 light sensor? Well, I hope that it would be more accurate than the 2 light sensor as provided by the sample from Sasbadi. In my early attempts to make the vehicle, it is pretty accurate, but still a little slow.
Would need to optimized the program before trying to make it go faster. Speed and accuracy is required if you want to win!! :)
Wednesday, 2 April 2008
NRC 2008 - Ideas and Thoughts
I have been studying the NRC lower and upper secondary question. I must admit, it won't be an easy competition this year. There are so many things that we could consider. The list is endless, and if you need to test any and every combination, it would be a huge task.
Anyway, I will list down the stuff that we need to consider
Vehicle Design
So many different consideration. So many options. I guess, there is no 1 right answer. One may build a better robot, but without a good software design, it may not be able to complete the task and vice versa. To truly win the competition, the team must have a great design, in both software and hardware as well as speed and reliability.
Anyway, I will list down the stuff that we need to consider
Vehicle Design
- Build using studless design, or traditional lego bricks with studs?
- Using the NXT or RCX motor?
- Have 1 or 2 motor as the driving force?
- Do you use gearing to make the vehicle go faster?
- Do you use tracks, 2 or 4 wheels?
- Using NXT or RCX motor?
- When you grab the object is it from top down, or from the sides?
- Design using the Lego NXT-G software or Robolab 2.9?
- Do you use RCX or NXT light sensors?
- Do you use 1,2,3 or 4 light sensors?
- Do we hard code the software to run without considering the tracks (black lines)?
- Do we use a line following algorithm to move through the playing field?
So many different consideration. So many options. I guess, there is no 1 right answer. One may build a better robot, but without a good software design, it may not be able to complete the task and vice versa. To truly win the competition, the team must have a great design, in both software and hardware as well as speed and reliability.
Thursday, 27 March 2008
National Robotics Competition 2008 (NRC)
It is the time of the year again, the National Robotics Competition 2008 have just been announced. The question this year is not as simple as it used to be. It would be challenging for all.
You can view more details of the competition from the Sasbadi's website.
The three categories/theme are as follows:-
I have 2 sets of students who would be competiting in the competition. One for the Lower and the Upper Secondary category.
It won't be an easy task! Anyone can build a robot, but can you build an effecient, fast and effective robot?
You can view more details of the competition from the Sasbadi's website.
The three categories/theme are as follows:-
- Robot Recycling - Primary School Category. Full details here.
- Robot Energizing - Lower Secondary Category. Full details here.
- Robot Planting - Upper Secondary Category. Full details here.
I have 2 sets of students who would be competiting in the competition. One for the Lower and the Upper Secondary category.
It won't be an easy task! Anyone can build a robot, but can you build an effecient, fast and effective robot?
Can you build the Winning Robot?
Sunday, 23 March 2008
Lego Digital Design (LDD)
You must have seen some of the 3D Lego rendering in my previous post. It is not too difficult to get it done, compared to the the previous version of LDD Lego had done. The current version is really easy to use. It is not too complicated and will be perfect for most of us. It may not have as many parts as LDraw, but it should be sufficient.
You can download LDD from Lego directly. Click here to download.
LDD has all the Mindstorms NXT retail kit parts with the quantities stated. You'll be able to design your creation, and know whether will you be able to build it with a standard retail kit, or require extra parts.
Overall it is perfect. You may not be able to build a super complicated design, but it'll be enough for the most of us. What are you waiting for, go and download one today!
Thursday, 20 March 2008
Bluetooth Remote Controller for Cars
I have just completed a Bluetooth Remote Controller to control a BT based Car. It is actually the controller for the Car built by one my students. You can see his creation here. As you can see, the BT Remote Controller has an accelerator and a steering built in.
You can build you own Remote Controller based on the LDD file I have provided. It is available from here. A sample NXT-G programming have also been provided for both the BT Remote Controller as well as the BT Car. BT Remote Controller RBT file here. BT Car RBT file here.
Labels:
Bluetooth,
BT,
Car,
LDD,
Mindstorms,
NXT,
Remote Control
Sunday, 16 March 2008
Special Lego Robotics Classes
Today I had a another special 1 on 1 class for one of the students. When it comes to Lego Robotics, he is one of the more talented kids out there. From the previous class, I had instructed him to build a car and we would together create and program another NXT Brick as the BT Remote Controller.
As you can see from the following photos, he managed to create a car, using a turntable as a rear wheel differiantial. I know it sounds a little technical but if a 12 year old knows about it, shame on you!! :D
He had built a very simple steering on the front wheels. Not too sure of the name for these sort of steering mechanism, but a more popular styled steering is called the "Rack and Pinion Steering".
He also loves to build Bipeds or Walkers. In the month of March, NXTLog will be having a Biped challenge. I have instructed him to build a Biped and submit it. A little fun and challenge won't hurt anyone. You can read more about the Biped challenge at this link.
Wednesday, 12 March 2008
Lego NXT Advance Workshop
Today I had 2 students attend the NXTadvance Workshop. Since they were students of the previous tutor, Mr Andrew Lee, I had no idea of their levels whether in Building or Programming the NXT. The students in today's class were age 9 and 11.
Eric pictured here with his Lego Tshirt!
Kids being kids, afraid of the media!
The day started out well. Kids being kids at their age had short attention span, not to mentioned that it was their school holidays. We started out by building the BBot.
"Anybody can follow instructions and build a robot, but not everyone can program it"
The purpose was to teach them by examples more advance programming blocks. They needed to understand them before they could program more complicated and advance programs.
"Anybody can follow instructions and build a robot, but not everyone can program it"
The kids were very comfortable with building the BBot with the instructions given. After they had completed the BBot, I gave them a list of task to program. With the appropriate guidance, the kids had no issues completing the task on hand.
We proceeded to build more advance robot by the afternoon. Each of them, wanted to build something different. Allowing them to choose what they wanted to build, would encourage them to program it.
They day ended great, with me trying to manage the kids. They were more excited about their new creation, rather than how to write a good program to compliment their great invention. I can't blame them, kids at their age likes to have fun and games!
Eric pictured here with his Lego Tshirt!
A Simpler Grappler
This is my first post on my blog. The purpose of this project is to build a very simple Grappler (Robotic Arm). Because, I wanted to program using a Rotational Sensor block. I could only build a 1-axis robotic arm due to the 3 Tacho Motor and 3 Motor Ports limitation.
As you can, I have also used a very simple programming method. I wanted to test out, and to show how to use very simple Data Wires link between the Rotational Sensor block and the Techo block.
Subscribe to:
Posts (Atom)